Our BBA certified installation guide
Pro Fix System
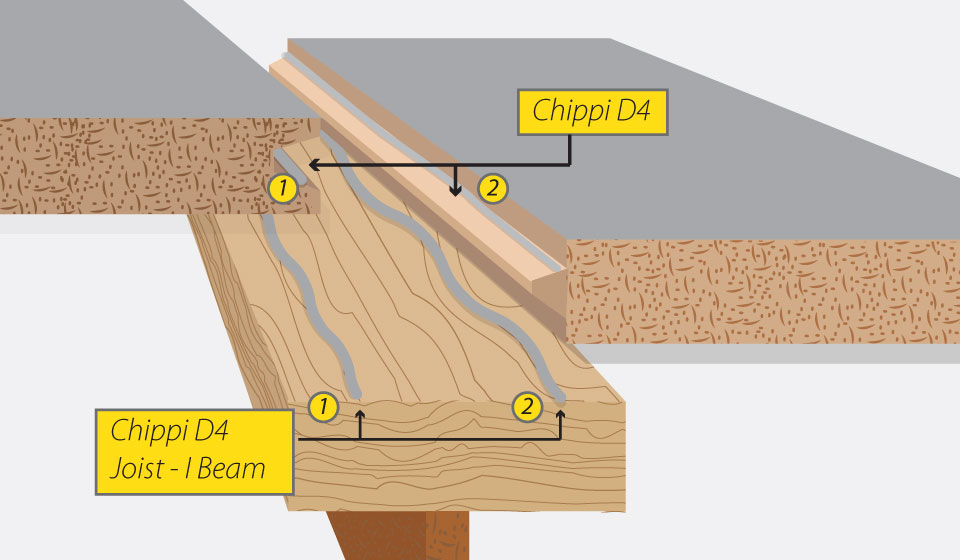
1. Two parallel beads of Chippi D4 Foaming Adhesive, each of minimum diameter 4 mm, are applied to the top of the I-joists for a length equivalent to the width of the board, for the first run of boards. (see Figure.1)
2. Boards must be fixed within 15 minutes, the first run being placed into position squarely, avoiding any unnecessary dragging which will disturb the adhesive. The first run is fixed to each joist along the perimeter, 50 mm from the board edge, using 55 mm annular ring-shank nails or screws. The boards are also fixed (either by nailing through the top surface of the board 50 mm from the board edge, or by secret nailing through the tongue of the long edge at 20° to the vertical), one annular ring shank nail being fixed to every second I-joist (ie one in the middle and one at each end, giving a total of three nails per board for 600 mm spaced joists).
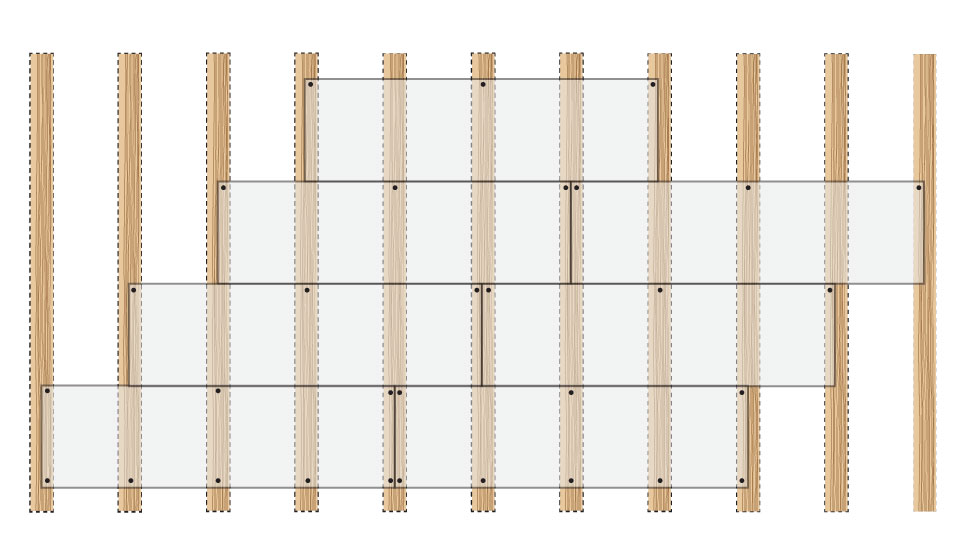
3. The adhesive is applied along the I-joists for a length equivalent to the width of the boards and the next row of boards is staggered by one joist. The boards are then fixed at the rate of three per board (ie one at each end and one in the middle). This nailing pattern gives a mechanical fixing every 1200 mm along each joist (see Figure 2).
Nailing Pattern
4. The tongue-and-groove joint is sealed with Chippi D4 Foaming Adhesive and any excess adhesive is not removed, but is allowed to cure and form a skin over the joint. Nail runs and exposed areas around the perimeter should be sealed by a brush coat of Chippi D4 Foaming Adhesive.
5. Subsequent rows are fixed as described in section 3. The last row of boards is fixed to each joist along the perimeter, 50 mm from the board edge.
6. The floor deck can be walked on immediately after fixing but further heavy construction work should be avoided for 24 hours. Care should be taken to avoid disturbing the Chippi D4 Foaming Adhesive until it has sufficient strength to resist damage.


